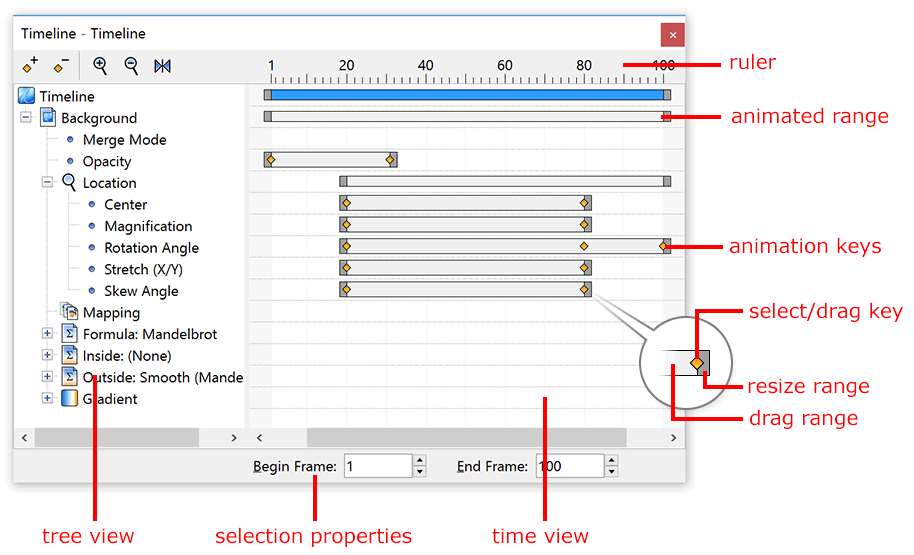
The Timeline tool window provides the most versatile way of editing your animations. It shows a tree view of all parameters in the fractal, grouped by layer and category, with an overview of their animation keys.
 |
To open the Timeline tool window, click the Timeline button on the animation bar, or click Timeline on the Animation menu. |

It is easy to discover which parts of a fractal are animated by looking at the animated ranges for different categories. To move a complete animated range, grab it in the middle and drag it to the left or to the right. To resize an animated range, drag the resize gribs at the left or right ends. This powerful way to edit animations adjusts all animated keys within the category that corresponds with the animated range.
You can also click on a single animation key and move it, or adjust its value with the selection properties panel at the bottom. To select multiple keys or ranges, hold down Ctrl (Windows) or Cmd (Mac) while you click. Hold down Shift to select a consecutive area of keys or ranges. This enables you to move or resize multiple items at once.
 |
To insert a new key, click the Insert button and then click in the time view where you want to create a new key. | |
 |
To delete the currently selected key or animated range, click the Delete button. | |
 |
Click the Zoom In button to enlarge the area with frames at the center of the time view, so you can work more accurately. | |
 |
Click the Zoom Out button to be able to see more frames at the same time. | |
 |
To scale the time view such that all frames of the animation will just fit in the currently visible area, click the Reset View button. |
Notes
Next: Interpolation
See Also
Tutorial: Working with animations
Time settings
Editing animations
Animation