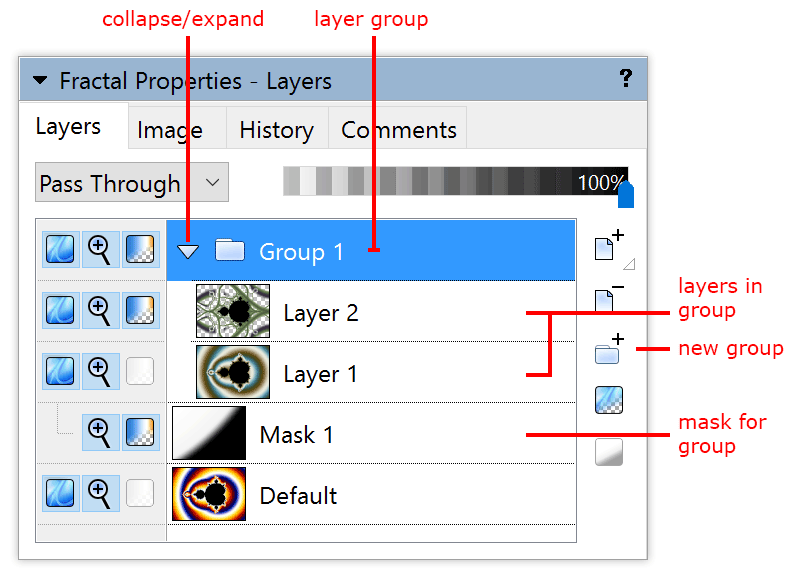
You can organize the layers in a fractal with layer groups. A layer group can contain any number of layers and nested layer groups. By logically arranging your layers in groups, the layers list becomes easier to manage. In addition, you can apply masks and merge modes to the entire group, which makes new creative effects possible.
Layer groups appear in the layers list with a folder-like group icon and a triangular collapse/expand button. Click this button to hide or show the items in the group. Layers in a group appear below it, indented to show their relationship.
 |
Click the New Group button to create a new layer group. The layer group starts empty. To fill the group, simply drag one or more layer onto the group to move them inside. (Remember that you can Ctrl-click or Shift-click to select multiple layers.) |
|
 |
To delete a layer group, select it and click the Delete button. This also deletes all items that the layer group contains. Tip: you can always undo unwanted deletions. |
You can easily move layers in and out of groups by dragging them around. While you are dragging, a thick black line shows where the dragged layers will end up. You can also nest groups simply by dragging one group inside another. Another way to move layers in and out of groups is with the Move Up and Move Down commands in the right-click menu for the layers list.
Layer groups have a merge mode just like layers, but with an additional Pass Through mode which is the default. If Pass Through is selected, the layers in the group are merged with the underlying layers one by one, as if they were not in a group at all. With the Pass Through merge mode and Opacity at 100%, the layer group organizes its layers without introducing any visual changes.
If a merge mode other than Pass Through is selected, the layers in the group are first merged together. Then, that intermediate result is in turn merged onto the underlying layers with the merge mode for the layer group. The resulting effect is often not possible to create without layer groups.
A group can also have a mask. In this case, the mask is applied to all layers in the group. Such a mask appears below all other items in the group, aligned with the group itself, as shown in the screen shot above. To turn a layer into a group mask, position it just under the group (but not inside it), and click the Use as Mask button. To apply an existing mask to a group, simply drag it onto the group. See also Working with masks.
See Also
Layers
How layers are merged
Masks