It is possible to add more than one transformation to the same fractal layer, so let's do just that.
- Add the 3D Mapping transformation on top of Kaleidoscope.
The idea of the 3D Mapping transformation is to map the fractal layer onto a three-dimensional surface. Let's first use the default, Plane shape.
 Multiple transformations |
| The 3D Mapping transformation |
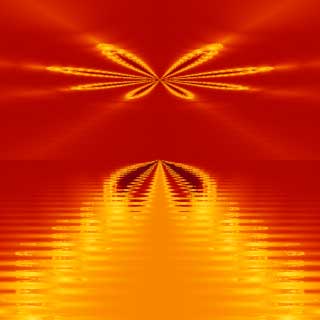
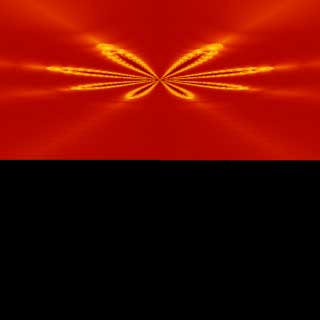
As you can see, our kaleidoscopic flower shape has been mapped onto the lower half of the fractal and the top half of the image is now black. This gives the effect of a floor extending toward the horizon.
We can make this mapping shift to the top half of the image, to become more of a sky-effect, by changing one of the transformation parameters. It is not immediately clear which of the parameters effects this change, so now is a good time to learn another way to get Help.
- Make sure the Fractal Mode tool window is visible, and move the mouse cursor over the different parameters for the 3D Mapping transformation.
The tool window will display a help text for the parameter currently under the mouse cursor.
In this case, a little investigation tells us that the parameter we need to change in order to make our fractal appear in the "sky" is the Y Translation parameter. It is currently set to -0.5.
- If we change that to 0.5, the fractal moves into the upper half of the image.
 You can also click on the ? button in the title bar (in the upper right corner) of the Layer Properties tool window and place your cursor over any parameter field or transformation setting. When you left-click, a helpful hint for that particular parameter or setting will pop up on the screen. Conscientious formula writers will provide helpful hints for their formulas' parameters. |
Now... what is this big black area doing in our image? Some transformations, like Lake and Kaleidoscope warp the fractal but still fill the entire image.
| Solid color in transformations |
Others, like the 3D Mapping transform, map the fractal onto an object or create a mask that does not fill the entire image. The leftover area that is not fractal is filled with a solid color, which is designated on the Mapping tab.
- To see this, click on the black area next to the Solid Color setting. This opens a Select Color dialog.
To change the solid color from the default Black to another color, adjust the sliders. You will see the changes immediately on your image. But what we really want to do in this image is to make the black area transparent.
- Drag the Opacity slider all the way to the left.
Now we can see both the Lake effect from the bottom layer and the Kaleidoscopic flower in the sky plane of our top layer.
- Click OK to close the "Select Color" dialog.