Now that our image is complete, save it again, in either the parameter or fractal file format you chose earlier.
There is one other method of saving images that you will want to use on occasion. If you want to make a larger render than is practical onscreen or render the best-quality image, you will want to use Ultra Fractal's Render to Disk feature.
 Rendering images |
For fun, let's make a render of this image that you can use as your desktop wallpaper.
 |
To start the disk render, select Render to Disk from the Fractal menu. |
In the Destination File field, Ultra Fractal will suggest a file name for the rendered image. Write it down so you will know where the image is going to be saved.
- Make sure that Bitmap image (*.bmp) is the selected File Type.
- In the Size field, enter the Width and Height of your computer desktop (for instance, 1920 and 1080).
(Windows) If you do not know your desktop resolution, minimize Ultra Fractal and right-click on your Windows desktop. Click Display settings, then Advanced display settings, and look for the Resolution setting.
(Mac) If you do not know your desktop resolution, click About this Mac on the Apple menu. The resolution of your monitor is shown in the Displays tab.
In most cases, the Anti-aliasing setting of Normal is sufficient.
The difference between an exported and an anti-aliased render of this image is demonstrated in the two examples below:
| Anti-aliasing |
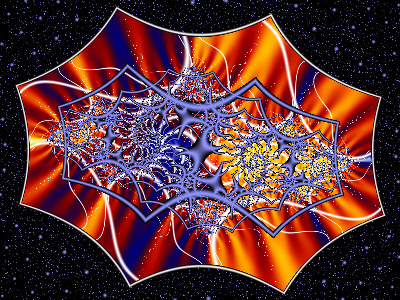
Exported
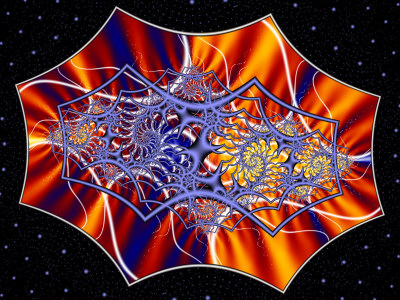
Rendered to disk with anti-aliasing
Notice how much smoother and cleaner the second image is. Fine filaments, like the white wave tendrils, are much nicer when the image is anti-aliased.
Note: Remember that all exported and rendered images made with an evaluation copy of Ultra Fractal will be marked with Evaluation Copy text. Please purchase your copy of the software!
- To make sure the fine dots and filaments are rendered correctly, enable the Force Linear drawing method option. This forces Ultra Fractal to use the One-pass Linear drawing method on all layers which produces more accurate results than the default Guessing drawing method.
- You can accept all the other default settings in the Render to Disk tool window so click OK to start the render.
As the render starts, you will notice that the Render to Disk tool window on the right side of your screen opens. This window monitors and shows the progress of the render.
| Managing render jobs |
- When the render is complete, right-click on the Windows desktop and select Properties. On the Desktop tab, click the Browse button and locate the rendered image. (Usually, it will have been saved as My Documents\Masked Julia.bmp). Click OK.