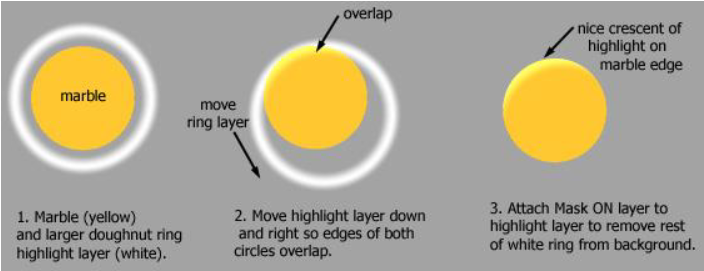
Hi Dannac, i don't know all the tutorial but reading the point 4.4 seems that you must create a mask, to do this you must have two layers, one is the mask and one is the layer that is masked, to attach the two layers in the Fractal properties(where are the layers) in the right the second icon from the botton is USE AS A MASK (shift+alt+k clicking on the mask layer) and the layer above will be masked from the layer under, i have done a quick example, using pixel a polar curve for a rose and a sfbm backgroud, as you can see the mask allow to show the backgroud layer but the SFBM backgroud doens't affect the rose.
For sure you must play with the point of control of the gradient in the opacity of the mask. Try to open the gradient of the mask and play with control points to look what happen, it's more simple to see it that explain it.
Ciao
Kept your background and added the other 2 layers to come up with something similar but different.
Thanks for the info .... it will helpful. Especially the tip of adjusting the gradient.
So much to this program. I'm amazed at what it does.
Fractal3_Spizzi_help {
::QmfGlgn2VTZTztNIQY47eG/fQjunEAhQSNDHabmeqna6dPUJsNjlAFA1Gnf9dRfYp46mWfM3
  Q7yuL7uPvarVU6F1fY9qoIvyXL5xfZwUyGXravsuNO6XqK/eeOCFtXq2t3zZwxaxRp1xTCRW
  alVKvjH/gQrF3ndHmcHBRI3/RdlVKiesVpNv8iK4B37JOSo9KRtS4U6d8jS36V9Zs/lUKa9K
  jmH/1gpI42mWRpyfkjhK3I97NV8muavqV4cRerQ7aFWp2PkpGRLUxdD5CsKtc0tIEKJjySKw
  F3dzwn50sEGtAH1I2p541r2asQaF9B2IeWFiMUytqapW0ATHno52utNxRQatH5xtqnl1VKHO
  e9Kl2pqkDzywTaLEt2olrXZ68/pL3TWfkzUrq4UCDTxkcG98SVWHHCasaf32VuX6/OcHXcU7
  mGTlk/4TdCr9I8pT9ikjvFBHtGfonhT+9qyDwZcIPwdkyKOmkQTZZ5Fo1r2ZFVKI/9POXjxA
  7atJSprkPzx0oSTtBmfTGwsRLYWWGDDDvRH5p9j7efEGBTpjeIFLDJDXkDDkh95FrJ602mkm
  +GYB+axiwO1d49EiU29DpFmOjYyyq047hjpi04vpsz+TALGWz9fw/mxJDIgVMyKfuGs48hLE
  2IDGfQ58CdZ4miA+MkBNn2zPDqfgfCwzBVLPYUb2Y2uJ08u+vHefjTZg+E6KTjW6chp6ZMWt
  SfQ2f5pVf4IAsi+tLGVMCCU40I4kyGtliynxscEDVQKOhmTwKmkizSQzOSnCIDzI59ZYiazP
  xmYCwwpTOKOVbaGJJhkPRzJo5HADYDc6Fx53onmoW0cPNbbxbD6nFKhFNz5JI0Fz3ksIFFFX
  IFQLsseXQg9JR5hdWTnu6t1Yv70R/H6nXJeGw5rU/MJeGC+60P/LxzC6a6vlvCtHtyQ/FpAa
  B9eGZjxZXWLQQTZjySLwz4VyJHgA9q+p+vR5Jt62
}

sam.ufm:pixeldis1 {
::tM1aYgn2lw4SOIMIUU05kwe4l6k24nAFSrY0FgzcLgWM+SoQj8aixVvgM8cy5exASn4MA+CX
  gNL4HnvQYgAMbEcmPGX+XUYE2CSO7uF9x16Q8cPnN5eaX9VBhk3lbbuVeDa7hrk7tlwYI11U
  Kmd0r4UOZOvBXspUx+wFydZbr4gQIUj6BlRa2tviH1jqBtR2xZ/ANQxLdA==
}

sam.ucl:TruchetTiles(BOTH) {
; By Samuel Monnier, 31.10.00
::tI/lUjn2tOV0utJMU03rU/HsovAhSSg1s2NtMxPQlqayjTTyzYWuaGbmtpq1f91GHcEh0qUp
  +AorP3jP3zBjBOo/+lXgQG0a0y+CSoKgRkDV1MBWjqyPadhfNTIa7V7yLqBOmFU+KziSFYoz
  oP3GnDzahF53tcWpUoTCDVK64VxmkwsNoMbHve7NRxs4SFlWtI2QSzLuJxSxvvxwJJDbDqRS
  KmFTkJof6NdPYZjoiiWveAC5TF+PqYi7lxkGPf11zXlkkZfFIVMmU2USUmiORzePYMO/CN4/
  6LPluniY6Bt5VQdID2N9D7IGNsqijYewOnfqzOrYn9Ryd65m70PrcPU4euC4V0nd0y/dpeHQ
  +nvTFtG3x8XB0gmZ/2gi2K7I7oa0WgRVRuW7os2aw3Vhbycr/1TYJI6UEBrY+OdTgoW0Cu/n
  j0ediGMRLWibQuTAvVJ4WNI4Oq3bBj8o7tEKcGR5dNOOP6+P/lIU0m/3hlyXi2nyeZHPD3dt
  Jz4BsWTlc0GbzJzKf+y3WO7103UtHFasDbq7fPFDHBj0crDlTVqTIW+7kW7N/JatxCONlFf5
  mVf927+2RW7VTbeRWB==
}

mt.ucl:mt-curves {
 ; Mark Townsend, 4 July 1999
;
; Orbit traps based on various curves.
;
::fCLonin2djVbvttNQ4vXg+f4mNQjVCibsdeZoLdwbdYABYdYotA7LFJgWiKmoykGS0rJB9H/
  O+qIFVS3i92aXRbN5Ryn7uHe3JSy4M5Le6TAQWTWf1dwLhj89W76x4SgJp1u+lVCiEKYNSCP
  nGLVcVX5qVrxLEiFCRlW6aaBKrkU1QbBZFjrhBHZCdWA61kC2mmYNKXSlEjIt6Kh5cxViSt+
  w5ansxQWRuxZHDx26mHCzb+AbtaSUrZkMZ9MgDihWvCeBqRQp7KhYtmLtrR/zBwElINpaNUC
  SPTHN8uMn5mvp+PoaD1MRA+O4Vk6CmgVY67975EYfY0E0mzFNj0Iml5s8Ism0i1bEOvKGHFE
  z5YDDO9CzUPILFFCOl0HQNM+nFoZOg+ZRFbzqOwcoe5t+EybHjC8mpVqRVmOXOtX9ccLDebF
  929ag3SvRyy7owU0hnDzyucWvgeiD0fcjE3VLrutPagez6RBbLHOdfDDvvRwBwIv1/8JTzyu
  8EfEkGu2MPhK87lO4D9akYKrYrH5HKQhgHlwsFXmEZRzoc1/hReY8jZws2ZrVqby2Jizr1gy
  M+89/HX8seJrEF0gkPc/oCDDbk20rSYkO/47d5WP7ZmEmz9pdZw79aEHN0bO3XiwNjgSGBT0
  NaQNpeGNqmVLN4GOs4l6nI5qSmDvLSkquZLrZGyvJ7Cti4oJ+cDWN6CYWWN8o5pvxVWNhzm/
  RWhcZotaq+Kr3Q/Khp8lj+Filo2RxT/PgbmFHF9RmcJjvTCj8lNO364fVzTHHFDtl00/lUDs
  75mT6UtGCW5jgdC+myDWyO1XfQiIin6hH/nPG604cttjlCT1iYs/mFl+SkoOLKZbHGN9vO3s
  lZb+T5pOnUJjTqeh/CLj6ccA4Tfq739SFNTJyxPdqwlO7TTFdWmiUdIEGEOvBPju9qHD1tDI
  W12M0e8k55iKRd3j7hrjxLo3grzzy4tnqJ8CxKOtRdy1aKpa0QjoMDXEc07IUnkgawu3nB32
  zmefoPNB9jGf0E11Z8hAbtOmloD9XOMxSZbP+HngvCeNMWdsDUyJ9qE2Ky17QlcK4z0MXMhw
  vui6v3sVRupgr3M+5theQ7S0/eAm+sPMcNzNhwkR/cngXAckdiqbaqln6wWEf0hyn16e9EKs
  Obbw+b/rQd+709lNHGEmEVDt1Ff6TKolkNV2HwiJ1mwgXpu0ezADTtmUTWB67xbWWOZtkJ4+
  JOwpjNr0ysP7yAYg6VTU/Yf3Dsp5lLwGmXUAb4fOgBW7zoPw9kPmu+quJmwrRhdtAzBvUqzf
  ZQsj/+O+BMHc1Nkr37juk+gojx5XqrX73kfQ7vNILlDVDx4X3xJ+Jbt5BtNhhTxeXg0FRtYs
  9rJXzZyNFaWG38VDjlSS8hfQFugD+OkGxjG0uI9AgUoJ4YPI2BI9v3b/qv12tBTqo4xH1lOa
  xing1vpkTRHLBojHbznWaePnBvbJrBw/yFSYTD+x2SRt/p+AstNy6+VfwpeCMhfXJNR9HNeS
  PqPXwl1iqG1j1ZgDEl6O0K6KKX2MGuQunxIj3K0msKSDIVVuVJ1bLYwRz4HwudvwakZ7jGaU
  7iqpMof+SpHM0aB+lYUrsklBLoITiuDRmjr96O2ta5i6FM54UOyIAvLirz9lFE8yvJOyvKGH
  bYPC/YlADsxQgdixGcAuAz8t6jytgk/hrrFb4FJKo9wzOL/C1msx4zXSz/AtwYcKfR9BmaKf
  Pp/43x0OOImvqHQbPq4KYJRFZB0ySauEQPR5v7ZrTtX3NuHI2CC932vkk40vxPUfbKkiC8/s
  rHkY63G0q1x14/ytl36ZrItGxfS8vdi6
}
>Hi Dannac, i don't know all the tutorial but reading the point 4.4 seems that you must create a mask, to do this you must have two layers, one is the mask and one is the layer that is masked, to attach the two layers in the Fractal properties(where are the layers) in the right the second icon from the botton is USE AS A MASK (shift+alt+k clicking on the mask layer) and the layer above will be masked from the layer under, i have done a quick example, using pixel a polar curve for a rose and a sfbm backgroud, as you can see the mask allow to show the backgroud layer but the SFBM backgroud doens't affect the rose.
>For sure you must play with the point of control of the gradient in the opacity of the mask. Try to open the gradient of the mask and play with control points to look what happen, it's more simple to see it that explain it.
>Ciao
Kept your background and added the other 2 layers to come up with something similar but different.
Thanks for the info .... it will helpful. Especially the tip of adjusting the gradient.
So much to this program. I'm amazed at what it does.
````
Fractal3_Spizzi_help {
::QmfGlgn2VTZTztNIQY47eG/fQjunEAhQSNDHabmeqna6dPUJsNjlAFA1Gnf9dRfYp46mWfM3
Q7yuL7uPvarVU6F1fY9qoIvyXL5xfZwUyGXravsuNO6XqK/eeOCFtXq2t3zZwxaxRp1xTCRW
alVKvjH/gQrF3ndHmcHBRI3/RdlVKiesVpNv8iK4B37JOSo9KRtS4U6d8jS36V9Zs/lUKa9K
jmH/1gpI42mWRpyfkjhK3I97NV8muavqV4cRerQ7aFWp2PkpGRLUxdD5CsKtc0tIEKJjySKw
F3dzwn50sEGtAH1I2p541r2asQaF9B2IeWFiMUytqapW0ATHno52utNxRQatH5xtqnl1VKHO
e9Kl2pqkDzywTaLEt2olrXZ68/pL3TWfkzUrq4UCDTxkcG98SVWHHCasaf32VuX6/OcHXcU7
mGTlk/4TdCr9I8pT9ikjvFBHtGfonhT+9qyDwZcIPwdkyKOmkQTZZ5Fo1r2ZFVKI/9POXjxA
7atJSprkPzx0oSTtBmfTGwsRLYWWGDDDvRH5p9j7efEGBTpjeIFLDJDXkDDkh95FrJ602mkm
+GYB+axiwO1d49EiU29DpFmOjYyyq047hjpi04vpsz+TALGWz9fw/mxJDIgVMyKfuGs48hLE
2IDGfQ58CdZ4miA+MkBNn2zPDqfgfCwzBVLPYUb2Y2uJ08u+vHefjTZg+E6KTjW6chp6ZMWt
SfQ2f5pVf4IAsi+tLGVMCCU40I4kyGtliynxscEDVQKOhmTwKmkizSQzOSnCIDzI59ZYiazP
xmYCwwpTOKOVbaGJJhkPRzJo5HADYDc6Fx53onmoW0cPNbbxbD6nFKhFNz5JI0Fz3ksIFFFX
IFQLsseXQg9JR5hdWTnu6t1Yv70R/H6nXJeGw5rU/MJeGC+60P/LxzC6a6vlvCtHtyQ/FpAa
B9eGZjxZXWLQQTZjySLwz4VyJHgA9q+p+vR5Jt62
}
sam.ufm:pixeldis1 {
::tM1aYgn2lw4SOIMIUU05kwe4l6k24nAFSrY0FgzcLgWM+SoQj8aixVvgM8cy5exASn4MA+CX
gNL4HnvQYgAMbEcmPGX+XUYE2CSO7uF9x16Q8cPnN5eaX9VBhk3lbbuVeDa7hrk7tlwYI11U
Kmd0r4UOZOvBXspUx+wFydZbr4gQIUj6BlRa2tviH1jqBtR2xZ/ANQxLdA==
}
sam.ucl:TruchetTiles(BOTH) {
; By Samuel Monnier, 31.10.00
::tI/lUjn2tOV0utJMU03rU/HsovAhSSg1s2NtMxPQlqayjTTyzYWuaGbmtpq1f91GHcEh0qUp
+AorP3jP3zBjBOo/+lXgQG0a0y+CSoKgRkDV1MBWjqyPadhfNTIa7V7yLqBOmFU+KziSFYoz
oP3GnDzahF53tcWpUoTCDVK64VxmkwsNoMbHve7NRxs4SFlWtI2QSzLuJxSxvvxwJJDbDqRS
KmFTkJof6NdPYZjoiiWveAC5TF+PqYi7lxkGPf11zXlkkZfFIVMmU2USUmiORzePYMO/CN4/
6LPluniY6Bt5VQdID2N9D7IGNsqijYewOnfqzOrYn9Ryd65m70PrcPU4euC4V0nd0y/dpeHQ
+nvTFtG3x8XB0gmZ/2gi2K7I7oa0WgRVRuW7os2aw3Vhbycr/1TYJI6UEBrY+OdTgoW0Cu/n
j0ediGMRLWibQuTAvVJ4WNI4Oq3bBj8o7tEKcGR5dNOOP6+P/lIU0m/3hlyXi2nyeZHPD3dt
Jz4BsWTlc0GbzJzKf+y3WO7103UtHFasDbq7fPFDHBj0crDlTVqTIW+7kW7N/JatxCONlFf5
mVf927+2RW7VTbeRWB==
}
mt.ucl:mt-curves {
; Mark Townsend, 4 July 1999
;
; Orbit traps based on various curves.
;
::fCLonin2djVbvttNQ4vXg+f4mNQjVCibsdeZoLdwbdYABYdYotA7LFJgWiKmoykGS0rJB9H/
O+qIFVS3i92aXRbN5Ryn7uHe3JSy4M5Le6TAQWTWf1dwLhj89W76x4SgJp1u+lVCiEKYNSCP
nGLVcVX5qVrxLEiFCRlW6aaBKrkU1QbBZFjrhBHZCdWA61kC2mmYNKXSlEjIt6Kh5cxViSt+
w5ansxQWRuxZHDx26mHCzb+AbtaSUrZkMZ9MgDihWvCeBqRQp7KhYtmLtrR/zBwElINpaNUC
SPTHN8uMn5mvp+PoaD1MRA+O4Vk6CmgVY67975EYfY0E0mzFNj0Iml5s8Ism0i1bEOvKGHFE
z5YDDO9CzUPILFFCOl0HQNM+nFoZOg+ZRFbzqOwcoe5t+EybHjC8mpVqRVmOXOtX9ccLDebF
929ag3SvRyy7owU0hnDzyucWvgeiD0fcjE3VLrutPagez6RBbLHOdfDDvvRwBwIv1/8JTzyu
8EfEkGu2MPhK87lO4D9akYKrYrH5HKQhgHlwsFXmEZRzoc1/hReY8jZws2ZrVqby2Jizr1gy
M+89/HX8seJrEF0gkPc/oCDDbk20rSYkO/47d5WP7ZmEmz9pdZw79aEHN0bO3XiwNjgSGBT0
NaQNpeGNqmVLN4GOs4l6nI5qSmDvLSkquZLrZGyvJ7Cti4oJ+cDWN6CYWWN8o5pvxVWNhzm/
RWhcZotaq+Kr3Q/Khp8lj+Filo2RxT/PgbmFHF9RmcJjvTCj8lNO364fVzTHHFDtl00/lUDs
75mT6UtGCW5jgdC+myDWyO1XfQiIin6hH/nPG604cttjlCT1iYs/mFl+SkoOLKZbHGN9vO3s
lZb+T5pOnUJjTqeh/CLj6ccA4Tfq739SFNTJyxPdqwlO7TTFdWmiUdIEGEOvBPju9qHD1tDI
W12M0e8k55iKRd3j7hrjxLo3grzzy4tnqJ8CxKOtRdy1aKpa0QjoMDXEc07IUnkgawu3nB32
zmefoPNB9jGf0E11Z8hAbtOmloD9XOMxSZbP+HngvCeNMWdsDUyJ9qE2Ky17QlcK4z0MXMhw
vui6v3sVRupgr3M+5theQ7S0/eAm+sPMcNzNhwkR/cngXAckdiqbaqln6wWEf0hyn16e9EKs
Obbw+b/rQd+709lNHGEmEVDt1Ff6TKolkNV2HwiJ1mwgXpu0ezADTtmUTWB67xbWWOZtkJ4+
JOwpjNr0ysP7yAYg6VTU/Yf3Dsp5lLwGmXUAb4fOgBW7zoPw9kPmu+quJmwrRhdtAzBvUqzf
ZQsj/+O+BMHc1Nkr37juk+gojx5XqrX73kfQ7vNILlDVDx4X3xJ+Jbt5BtNhhTxeXg0FRtYs
9rJXzZyNFaWG38VDjlSS8hfQFugD+OkGxjG0uI9AgUoJ4YPI2BI9v3b/qv12tBTqo4xH1lOa
xing1vpkTRHLBojHbznWaePnBvbJrBw/yFSYTD+x2SRt/p+AstNy6+VfwpeCMhfXJNR9HNeS
PqPXwl1iqG1j1ZgDEl6O0K6KKX2MGuQunxIj3K0msKSDIVVuVJ1bLYwRz4HwudvwakZ7jGaU
7iqpMof+SpHM0aB+lYUrsklBLoITiuDRmjr96O2ta5i6FM54UOyIAvLirz9lFE8yvJOyvKGH
bYPC/YlADsxQgdixGcAuAz8t6jytgk/hrrFb4FJKo9wzOL/C1msx4zXSz/AtwYcKfR9BmaKf
Pp/43x0OOImvqHQbPq4KYJRFZB0ySauEQPR5v7ZrTtX3NuHI2CC932vkk40vxPUfbKkiC8/s
rHkY63G0q1x14/ytl36ZrItGxfS8vdi6
}
````
edited Jul 12 '22 at 11:10 pm